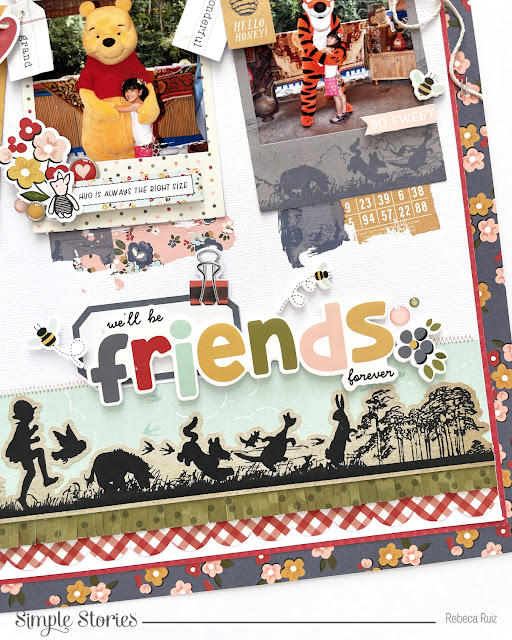
Hello! Documenting our memories at Disney is something I really enjoy doing and today I'm very happy to share with you a layout I designed for Simple Stories using the Say Cheese Classic Pooh collection. I started this layout with the idea of using the Polaroid frame to display the photos. This die is a collaboration between Spellbinders and Simple Stories. After that, I started playing with all the beautiful products in the collection to create this fun and colorful layout of my daughter getting the autographs of Pooh, Tiger and Eeyore in 2012 when they had a spot at Animal Kingdom.

For the frames, I used papers from the 6" x 8" pad to get smaller designs that can be displayed. I placed them on the top area of the white cardstock but before glueing them, I added a bit of color and designs using the rub-ons from the Say Cheese Classic Pooh collection.
On the left frame, I used a yellow floral paper and rub-ons in off white and blush. To hold the photo, I used a cord with a few loops and insert a few tags and die cuts to embellish it. Then, on the top part of the frame I added a red paper clip and a phrase I cut from one of the papers to give the impression that the photo was hanging from the cord. On the bottom part of the frame, I added a few die cut pieces to embellish the area and some decorative brads and a small enamel dot.
For the central frame, I used a cream polka dot paper and to give contrast on the back of it, I used piees of the "Hunny" card, blue strokes and pink floral designs from the rub-ons. I continued with the cord design to hang the photos and this time used a tab to hold it. To embellish the frame, I used a mix of die cuts, stickers, decorative brads, and enamel dot.
On the right side frame I used a gray paper to cut the Polaroid design. I cut it strategically to have the characters design on the bottom strip. For this one, I used the other part of the floral pink, "Hunny" card and blue strokes rub-ons. To hold the photo from the cord, I selected a dotted clip die cut and embellish the frame with other die cuts, stickers, chipboard, enamel dot, and decorative brads.
Once the top part was ready, I cut the white cardstock to 11" x 11" and framed it with a Tomato Color Vibe cardstock and the blue floral paper from the collection. Since I love adding patterned papers to my project, and there was an empty area on the bottom of the white cardstock, I added a few strips of paper to fill the space and to give the title an anchoring place.
First, I added the sticker scalloped border. Then, I cut a strip of green paper and used the fringe scissor to make the cuts, this way I give the paper texture and interest. Above it, I added the strip of mint paper and on top of it the kraft sticker with all the characters. To anchor the title, I used a die cut label and display the foam sticker in between the photos and the bottom decorations.
At the end, I added a few small details to the layout like enamel dots and a few bees from the sticker sheet, foam stickers and chipboard stickers. This is a layout full of little details, that I enjoy creating while remembering that day at Animal Kindgom.
Thank you so much for your visit. I hope you like this layout, and it inspires you to craft! Have a wonderful day and come back soon for more inspiration.


No comments